
Welcome!
Welcome to our guide for Smoke and Sacrifice. If you’re stuck, you’re sure to find the answers you’re looking for here. A lot of the fun of the game is in puzzling out some of the things found on this page, so you will not have that enjoyment if the read further. However, nobody likes to be totally stuck!
This should go without saying, but: HERE BE SPOILERS. If you have questions or are stuck in a specific area and want to avoid spoilers, you can post in one of the forums where the devs are active and we’ll get back to you with an answer soon:
Smoke and Sacrifice Steam Community (Switch players also welcome, but please specify platform!)
Smoke and Sacrifice Subreddit
Alternatively, you can email us directly with queries, feedback and bug reports at hello@solarsailgames.com. We answer everything!
Still here? Alrighty. Walkthrough below.
Contents
Main Quest Guide
Prologue
Act 1 – The Underworld
Act 2 – Finding your Son
Act 3 – Saving the World
World Map
Side Quest Guide
Resources Guide
Main Quest Guide
This includes only the things you must do in order to complete the main questline. Side quests are detailed in a later section.
Prologue
- You begin with a cutscene in which you are working on a farm. A fellow farmer will inform you that it’s time to stop work and return to the village to prepare for your son’s ritual.
- You can explore the village, examine objects and talk to the characters before going to your house to pick up your son.
- Head to the north end of the village to find your house (the shrine outside has a red roof). Optionally speak to the nurse nearby, then collect your baby by interacting with the house.
- As you walk away from the house, the nurse will direct you to the Sun Tree. Go there and speak to Father Telemak to begin the ritual. This triggers a new cutscene where you process with the priests to the temple.
- In the temple, speak with Father Telemak to receive his opening speech.
- Interact with the altar to place your baby on it and trigger the sacrifice scene. After this is completed, you are free to leave.
- As you exit the temple, a mysterious tinker will call you over to chat. After your conversation, the scene transitions to the farm again, seven years later. As you converse with a fellow farmer, the Sun Tree begins to fail unexpectedly.
- Head towards the village. A villager will warn you of a pugbear attack and ask you to look for the senior priests in the temple. Head northeast, avoiding the pugbears (although they cannot actually kill you in this section).
- As you approach the temple, the Mysterious Tinker will speak to you. In the ensuing conversation you will decide to fetch your son’s teddy bear from the shrine by your house (unless you picked it up already).
- Return to the village and retrieve the bear, then enter the temple. Step onto the altar to teleport to the underworld.
Act 1 – The Underworld
- Talk to the Locals: Scout around until you find a Drear Gatherer, and talk to them. They will tell you to catch a lantern-fly as a first step to protecting yourself from a danger called “the smoke”.
- Catch a Fly: Find some polyps and punch them to death. They are invulnerable while charging their attacks, so you will need to dodge out of the way and run back to get some hits in during the downtime. Pick up their tendrils and some branches to make a net, which you will automatically equip. Use the net to capture a lantern-fly; bring this to a Drear Gatherer to receive the lantern recipe.
- Build a Lantern: Pick a glowfern if you haven’t already, and use it to craft a lantern. Return to a Drear Gatherer to receive your reward: a recipe for Sourfruit Juice, a useful healing item that will also let you read recipe hides in the swamp.
- Show Podgi: Open your inventory and select Podgi Bear. Choose “Show” from its context menu while standing near a Drear Gatherer to ask them about your quest. They will tell you about a Feral Child who lives across the wasteland. To learn how to cross the wasteland, you will need to speak to the “Masters”, one of whom is now marked on your map.
- Find the Masters: Head to the south edge of the swamp, following the marker on your map. There you will find Smotherk, Priest of Flame and Marduk, Priest of Bone – approach them to trigger a conversation.
- First Weapon: After Smotherk leaves, talk to Marduk to receive the Spiked Cudgel recipe. If you don’t have any quills yet, you will need to explore and find some hoglings to kill. Once you have the ingredients, make a spiked cudgel and return to Marduk to receive two Rubbing Kits, plus a recipe for making more of them.
- Show Podgi: Show Podgi Bear to Marduk as you did to the gatherers. He will explain that you will need special boots to traverse the icy wasteland, for which he gives you the recipe.
- Find the Feral Child: Make the Fur Boots and use them to traverse the wasteland to reach Wildling’s Swamp on the other side. It’s worth smashing bone piles along the way – bone is a useful upgrade component and an ingredient in many early recipes. The Feral Child’s home is marked on your map when zoomed in; explore in that direction and you will trigger a cutscene on approach.
Talk to the Feral Child: Approach the Feral Child to trigger a conversation, at the end of which you will receive a quest to activate the nearby Workbench. - Activate Workbench: Make some gas bombs (optional but makes it much easier). Find the two nearby totem poles (they are marked on your map as “Workbench Activator”). Use gas bombs to neutralise the wasps near the poles if needed, and “Insert” sour tree branches into each one to activate them. Return to the Feral Child to receive a new weapon and a request for sweets.
- Crystallised Sourfruit: If you haven’t already, use a gas bomb to pacify some treaclewasps and then strike the tree to knock down their hive. You can destroy the fallen hive by attacking it, which will yield both treacle and treaclewasp paper. Use the treacle to make Crystallised Sourfruit and give one to the Feral Child.
- Restore Pendant: Speak again to the Feral Child to restore the functionality of your pendant and to receive a recipe for Spirit Sundae, which will recharge your light gauge.
- Befriend the Feral Child: At this point you can talk to the Feral Child about Podgi Bear to swap Podgi for the Runic Puzzle Cube, earning her trust and friendship. She will tell you the puzzle cube came from her foster, the Craftmaster, who will be able to help you locate your son. To locate the Craftmaster, you need to speak to the Tinker in Moilgrind Village. The Gatherers can tell you how to get to Moilgrind.
- Porkupine Hunt: SAVE YOUR GAME! Speak to the Gatherers and they will ask you to help them by killing a Porkupine that has been terrorising them in Wildling’s Swamp. Kill her – it’s a challenging fight – and return to the Gatherers with the Hog Snout. They will unlock the travel tube in Moilgrind Village for you. (NOTE: If for some reason you can’t retrieve the hog snout – e.g. if it falls into the tar – the hogmother will respawn if you leave the area for a few minutes. Spending some time exploring the starting swamp should do the trick.)
- To the Village: Use three Drear Tokens to unlock the Travel Tube north of the Feral Child’s house, from which you can freely travel to Moilgrind.
Act 2 – Finding your Son
- Kill Three Rats: Explore Moilgrind Village and talk to the villagers. They will ask you to help them by exterminating some rats that are infesting the storage area to the south and eating their supplies. They will give you some cheese, which you can place to distract the rats or attract them to some conveniently-placed explosive barrels. After collecting three rat meat, bring it back to a villager for your reward, a hammer recipe, and a new side quest.
- Find the Resistance: The Mysterious Tinker has now appeared in the village square, near the Cookpot. Before he will talk about your puzzle cube he wants you repay the favour you owe him by helping the Drear Resistance. Find and talk to the Resistance house (it’s at the east end of the village, marked by an iron chest outside) to receive a quest to harvest anglermole lanterns.
- Anglermole Lanterns: If you don’t have a hammer yet, you will need to make a Bone Mallet using the recipe you acquired from the villagers. After crafting your hammer, use it to aggravate anglermoles and kill them for their lanterns. Bring three anglermole lanterns back to the Resistance House. (Any extra lanterns you get will be very useful for crafting repair glue later.) Having handed in the anglermole lanterns, return to the Tinker to report your success and receive some wooden keys and a recipe for Hot Sauce.
- Puzzle Cube: You can now talk to the Tinker about your puzzle cube to gain information that allows you to continue with your quest. He will tell you the Craftmaster lives in Charstone Village, but you cannot get there until you’ve made some rubber galoshes. The first step toward this is to retrieve ice bombs from Marduk in the Mire of Bones, a long way south of Moilgrind. You will have to take a slightly roundabout route to walk there, skirting the coast eastwards through the Battlescarred Waste.
- Marduk’s Wrath: SAVE YOUR GAME! When you approach Marduk, he will immediately initiate conversation. He is angry you have been helping the Resistance, and you will need to defeat him in battle to earn the ice bomb recipe (and his bone key, which you can use to unlock the control panel for the overworld teleporter). You can also raid Marduk’s chest after defeating him for the flash bombs and milker you will need to make the ice bombs.
- Freezing Slime: Wait until smoketime and use a flash bomb to stun a smoke ghost. Equip the milker and use it repeatedly on the ghost to harvest several bottles of freezing slime.
- Galoshes: You can now craft ice bombs and use them on the cacti in Springspine Swamp (northwest of Moilgrind) to harvest rubber. Once you have acquired four pieces of rubber, you can craft the rubber galoshes at a cookpot.
- Activate Blastforge: Equip your new galoshes and head into the industrial biome next to the village. Travel to the Blastforge marked on your map earlier by the Resistance. You will need oil to turn the three pressure valves – you can harvest this from oil rocks in the wasteland using your hammer. Activating the blastforge allows you to craft better equipment if you find the recipes for it, and will open up a chain of side quests if you report back to the Resistance. To continue the main quest, however, you need to traverse the map east and then north through the industrial areas towards Charstone.
- Smotherk’s Warning: On your way to Charstone, you will be accosted by Smotherk. He is angry with you for invading his domain and sets his Supervisors on you, causing them to attack you on sight from now on.
- The Craftmaster: Speak to the Craftmaster in Charstone Village. He will inform you that he can’t speak to you as Smotherk has forbidden it. To get him to talk to you, show him your Puzzle Cube. He will then request that you reactivate the Manufactory for him, and mark a travel tube on your map so you can reach it.
- Repair the Manufactory: You will need to explore and use capacitors (dropped by Supervisors) to repair the four activation points for the Manufactory, which are scattered around in the vicinity of Charstone. Speak to the Craftmaster and to NPCs in different zones to get hints as to where to find them; if you’ve passed near one at any point, it may already be marked on your map. Once the manufactory is activated, return to the Craftmaster, who will give you a recipe for a Clockwork Shank and tell you where to find Smotherk.
- Smotherk’s Wrath: SAVE YOUR GAME! Travel to Smotherk’s Workshop, where you will meet Smotherk, Priest of Flame. It is recommended you are well-prepared for this – the Stoker’s Apron and Welding Mask armour provide protection against his fiery attacks, and black ice from a vending machine will provide additional protection. Defeat Smotherk to receive his Flame Glass, a Work Roster, and a recipe for the Stoker’s Boots.
- Craft Stoker’s Boots: The Work Roster is no use for finding your son until you discover his Drear name, which only Telemak knows. To find Telemak, you will need to travel to the World Heart. Return to the Blastforge to craft the Stoker’s Boots, giving you access to the brimstone fields.
- The World Heart: Equip your Stoker’s Boots and traverse the brimstone fields to find the World Heart at the centre of the map. As you approach, a cutscene will trigger to show it off and Telemak will give you some background information. After a flashback interlude in the overworld, he will also provide a name for your son – the Nimble Pipe-sweep.
- Finding your Son: Examine your Work Roster in your inventory to locate the Nimble Pipe-sweep on your map. He appears in Moilgrind Furnaces, so travel there.
Act 3 – Saving the World
- The Bomb: As you approach your son’s location, Telemak accosts you again. He threatens to destroy the area and kill your son if you don’t give him the Heretic’s Boots recipe. After you capitulate, he destroys the area anyway. Watch the resulting cutscenes, then talk to the Tinker to get a recipe for a Rope, which you can use to rescue your son.
- Rescue: You will need to craft the rope at the Workbench. When you get there, the Feral Child insists on returning Podgi Bear to you to give to Lio. Return to the pipe after crafting the rope and use it to rescue your son. He thanks you – but he does not remember you, not even when you show him Podgi Bear. The Tinker will intervene at this point – he has an idea as to how you may save your son, but the more urgent task is to save Moilgrind Village from burning down.
- Put out Houses: Use either ice bombs or water (which can be obtained from the village pump) to put out the five burning houses at the southeast end of Moilgrind. It’s a good idea to equip the Welding Mask if you have it to avoid being set on fire. Return to the Tinker, who will thank you and explain that all the Drear, including your son, can be saved from the addling effects of the smoke by harnessing the power of verdite.
- Information on the Crucible: Read the Tinker’s notes to gain the Verdite Reactor recipe. Travel back to Charstone to ask the Craftmaster about unlocking the Crucible. He will mark the Crucible on your map and give you a recipe for Nectar, which you will need to use on the activators in Heretic’s Cavern, and a Radiant Diadem, which he will want to see as proof you have activated the Crucible.
- Unlocking the Crucible: Craft the Heretic’s Boots at the Manufactory if you haven’t already, and travel to Heretic’s Cavern. Find the four activators and use nectar on them to get the Crucible working. Craft a Radiant Diadem at the Crucible and return to the Craftmaster.
- Secrets of the Craftmasters: Since you are the Chosen One who has activated the Crucible, the Craftmaster has two more things to give you – a Verdant Sabre recipe and an object currently locked in an impervious alchemical material. In order to release this object, he needs to craft a dissolving agent made of several rare ingredients, which he will now request from you. Bring him two raptor skulls, six hog snouts and four pango shells to receive the Strange Metal Core.
- The Verdite Reactor: Return to the Crucible and use the Core to craft the Verdite Reactor. When you walk away from the Crucible, Telemak will accost you and ramble about his plans before challenging you to meet him in combat on the Burning Plain.
- Telemak’s Madness: SAVE YOUR GAME. Travel to the Burning Plain to find Telemak and trigger a battle. After you defeat him, you will receive his power cell, and instructions to meet the senior priests in the overworld.
- Report Success: Return to the Tinker to report your victory. He asks you to head to the teleporter and repair it if you haven’t already.
Repair the Teleporter: Repairing the teleporter requires using Marduk’s Bone Key, Smotherk’s Flame Glass and Telemak’s Power Cell on different elements of the teleporter. After you have done so, step onto the podium to trigger a final cutscene. - Epilogue and Credits: After a cutscene in the underworld, you, the children, and several Drear will appear in the overworld, to be greeted in consternation by the acolytes of the Sun Tree. Fast forward to a confrontation between Sachi, the villagers and the unmasked priests. After that, we skip ahead six months and credits will roll over the final playable segment. You have now completed the game and can quit whenever you choose.
World Map
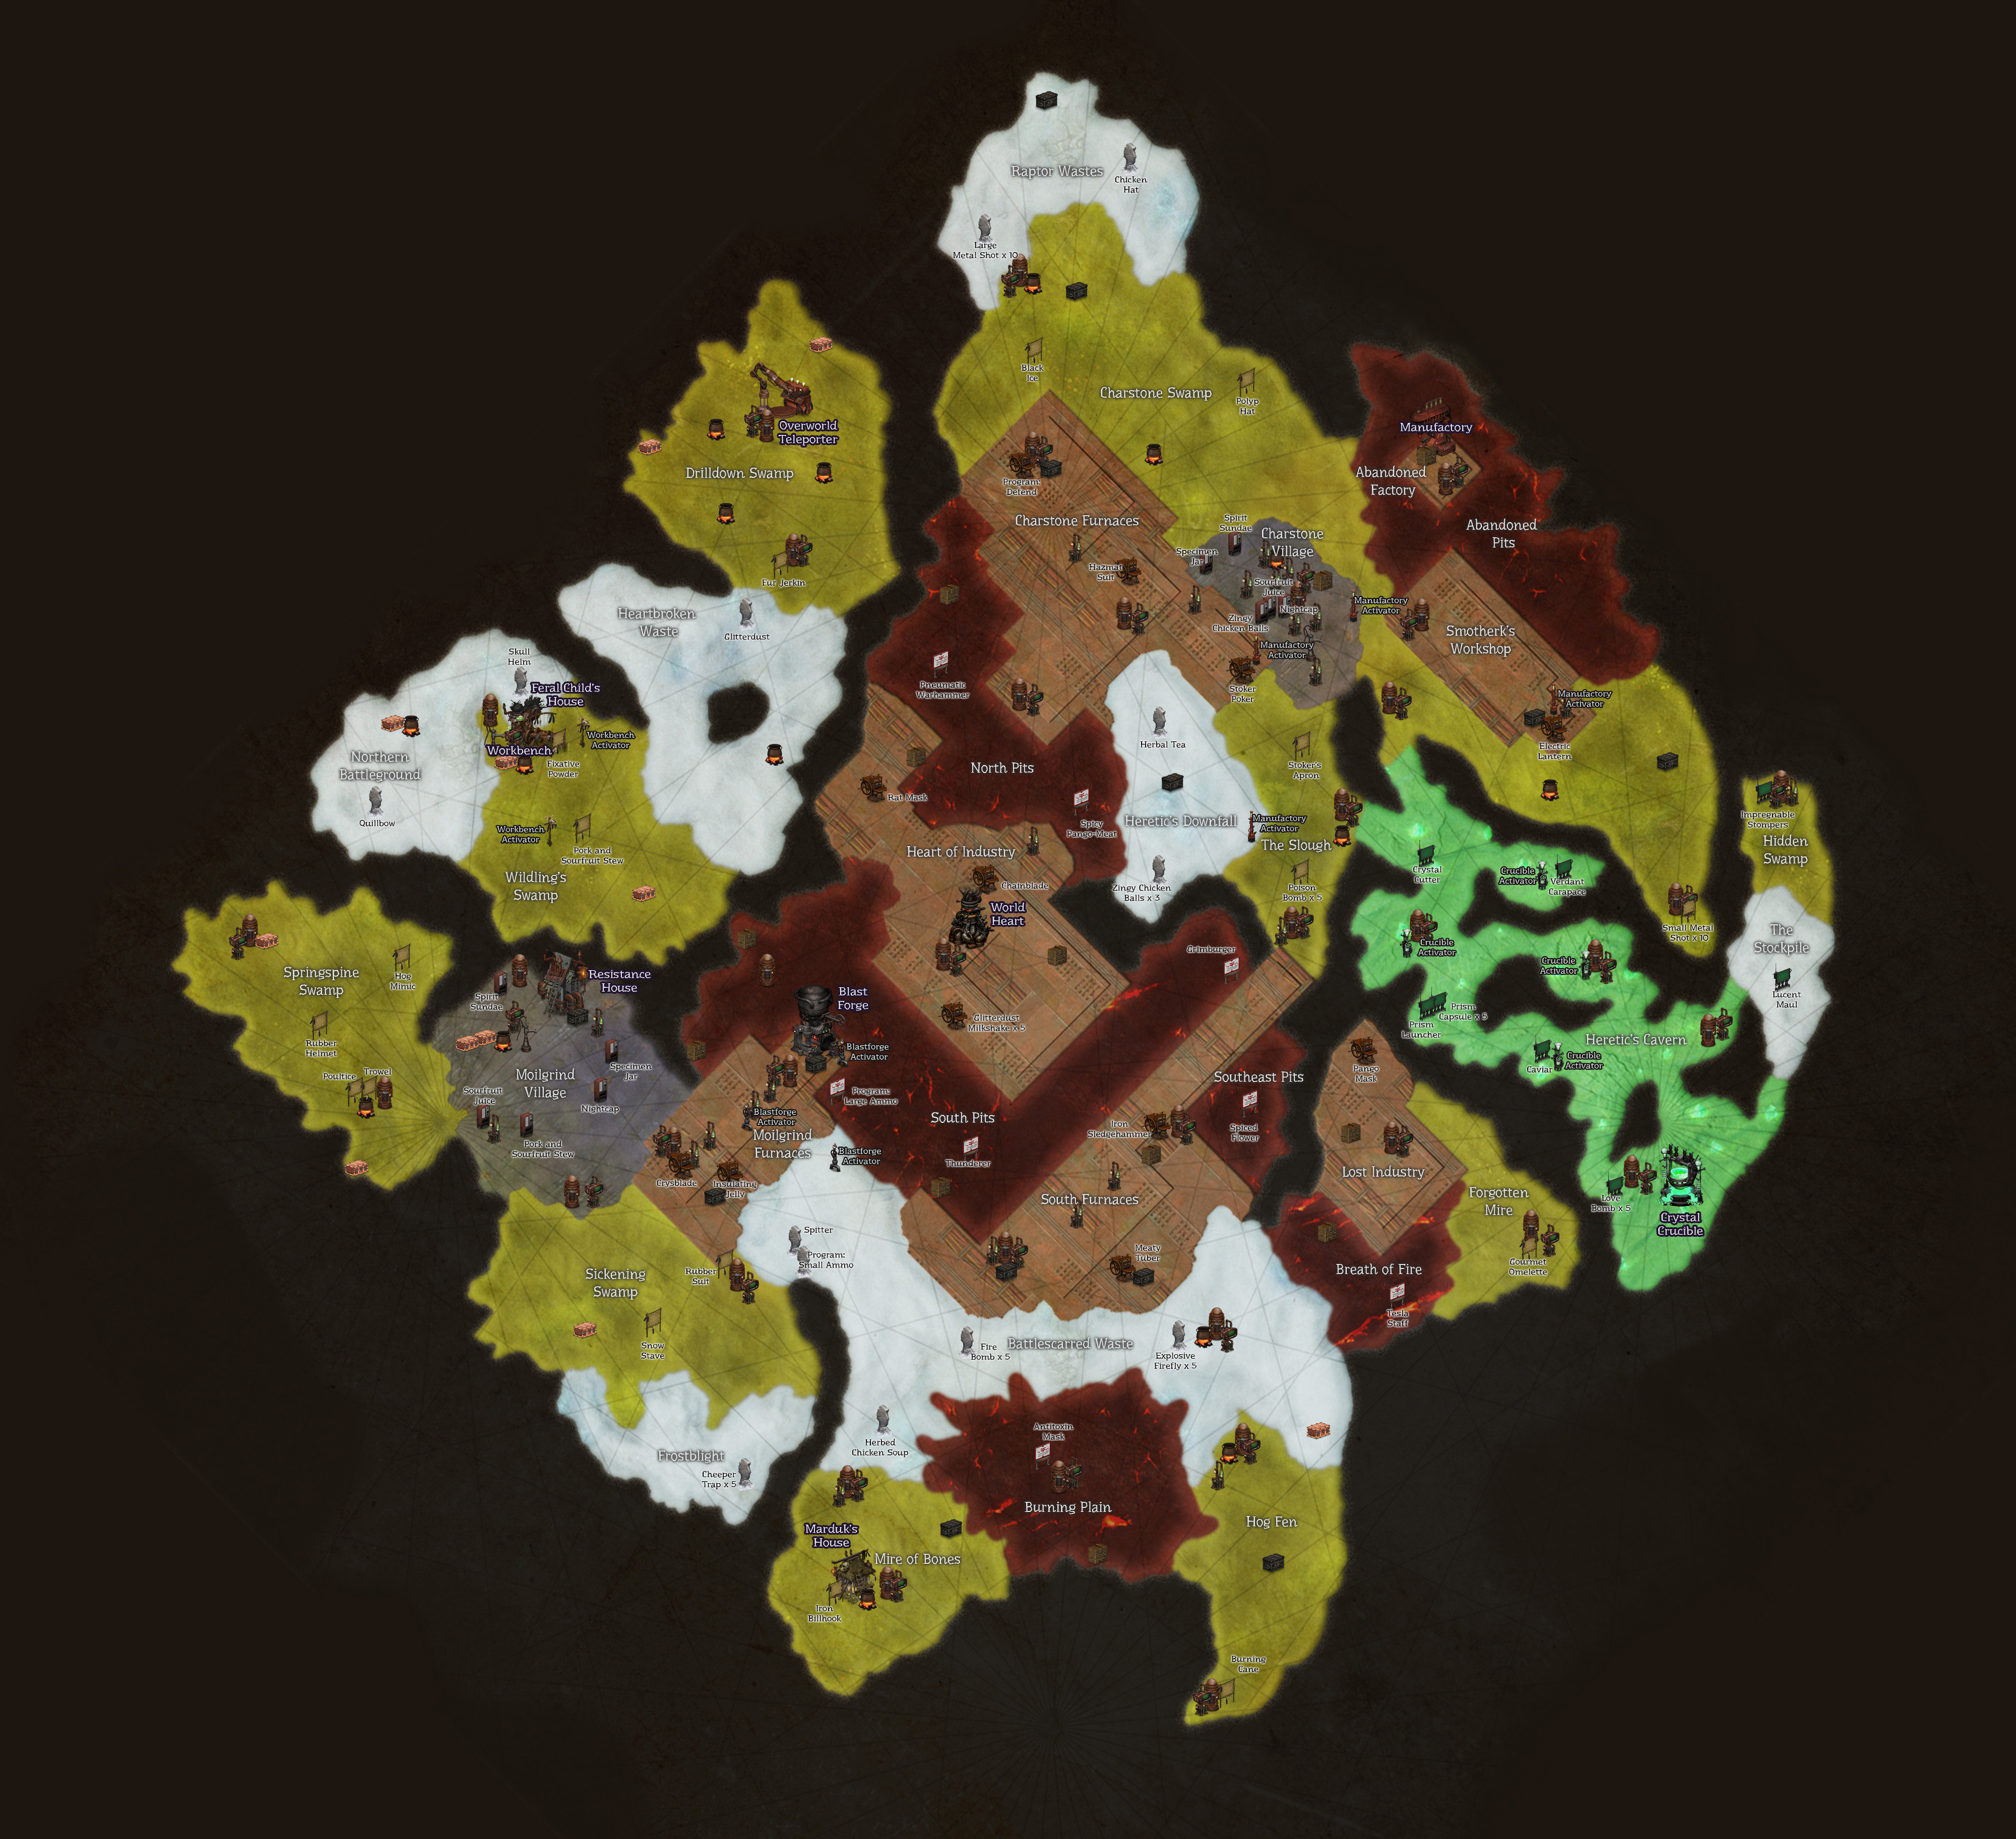
Side Quests Guide
Resources Guide
Where to find all those weird components for your recipes.